 If you are looking to save money and do not mind learning a new trade, installing your own windows might be a perfect fit. Vinyl replacement windows can offer you several energy-efficient aspects and they’re practically maintenance-free as well, according to the Department of Energy. Replace your energy-wasting windows with brand new ones that will last for many years. Here’s what you need:
Required Materials and Tools
- Small prybar
- Utility knife
- Wood chisel
- Cordless drill
- Hammer
- Screwdriver
- Tape measure
- A square
- Miter saw
- Wood shims
- Dripless caulking gun with several caulking tubes
Measure Your Existing Window
Be sure to measure your existing window from the inside rather than the outside.
- Measure the width.
- Run your tape measure starting on one side of your window jamb over to the opposite side. Measure at the top, middle, and bottom. The smallest measurement should be your guideline.
- Measure the height.
- Measure the window from the top jamb inside to the inside of the window sill. Measure right, middle, and left and use the smallest measurement.
Remove the Window Stops
With your prybar in hand, utility knife, and screwdriver – remove the window stops.
Remove the sash
- Start by removing the inside sash of the window. Get rid of any chains, sash cords, or rope.
- Slide down the window’s outside sash. Next, get rid of the parting beads and throw them away.
- Remove the window’s outside sash, but keep the outside stops.
- Clean and thoroughly prepare the interior faces of the window sill and jamb in order to accept the replacement window, making sure to sand down any splintering wood, patching small holes using wood putty, and filling in any large holes with clumps of fiberglass insulation.
Preparing For the New Window Installation
Before you start caulking, it’s crucial to temporarily set the replacement window inside the window opening to see how well it fits. Position the sashes within your replacement window at the center. Then, also slide your bumper stops near the center in order to view the mounting holes on the unit’s sides.
Get Ready To Caulk
- Caulk the jamb’s outside stops along the inside.
- Mark the window sill for the angle of the sill. Next, caulk and install.
- Put in the unit’s header piece on top and caulk all along the top. Secure with screws.
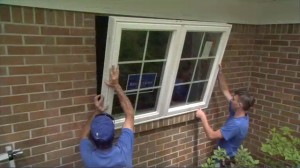
Installing Your New Window
- Place the new window in the opening, ensuring that each corner is perfectly square with the use of your square. Tap in the shims where necessary in order to square the window without knocking them in or making them flush. It’s important to leave an inch or so sticking out so you can easily remove them later.
- Screw in each side of the jamb at both the top and bottom.
- Continue to shift the header upwards until any gaps are closed between the frame and the window and screwing the header securely in place. If the shims look good, saw them off using your miter saw.
Last Step: Stops and Final Caulking
Carefully caulk the inside of your new window and install interior stops with small finishing screws. Replace any trim around your new replacement windows or install new.
Related Resource: Windows That Block Out Exterior Noise
You’re finished. Now that you know what you need to install windows on your own and how to do it, you can help other homeowners install their replacement windows with your new-found trade and skills.